
I’ve found the (almost) perfect solo sleep system: a take on the good old fashioned Aussie Swag by West Australian outdoor gear retailer and designer, Grab Me Gear, in collaboration with Terra Rosa Gear. It’s lightweight, as the name suggests, and kept me comfortable for a 4-day hike in the rugged Budawang Range.
First up, a disclaimer: Grab Me Gear’s owner Jimmy got in touch for a collaboration and sent me a prototype of his lightweight swag concept, comprising a mix of handmade and mass-manufactured items. To round it all out, I threw in a few things from my own gear stash. He wanted my honest opinion on the concept with a view to refining the design before taking it to market. And that’s why I say “almost”: Jimmy’s going to tweak it a bit more. But as you can probably tell from the introduction, I’m already a fan!
Introducing the Lightweight Swag
The lightweight swag concept is based on the traditional swag, a bedroll that contains a foam mattress in a water-proof (and sometimes insect proof) canvas bag.
Jimmy’s swag system comprises the following components (supplier and weights noted).
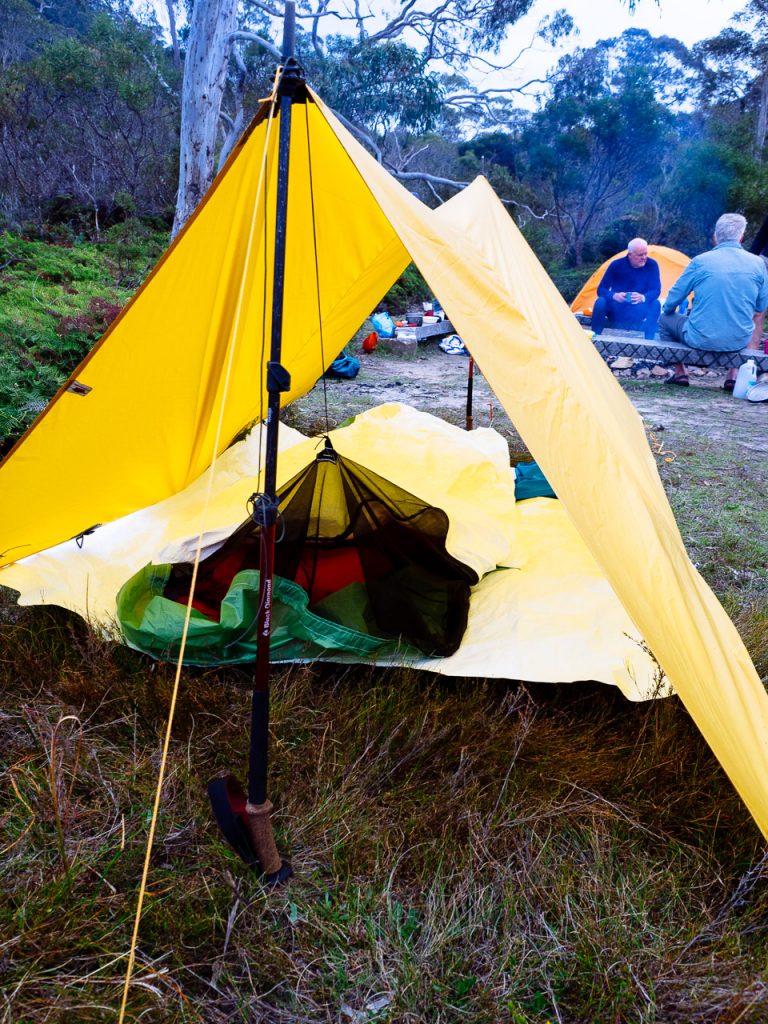
The lightweight swag concept in action at Styles Creek, Budawang Range, Morton National Park. Note the mesh hood (which can be covered too) and the cord to keep the hood away from the face.
Shelter components
- Swag Shelter with sil-poly base, mesh hood and soft Tyvek top – 450g (made by Melbourne-based Terra Rosa Gear, supplied by GMG)
- Dry bag – 20L Sea to Summit – 86g (supplied by GMG)
- 1.5 x 2m Tyvek ground sheet – 190g (optional, mine)
- Sleeping Mat – Sea to Summit Ultralight Insulated regular (mine)
I added in the following for weather protection:
- 2.4 x 3m sil-poly tarp (including cord and stakes) – 543g (custom made by Terra Rosa, mine)
- Hiking Poles – Black Diamond Ergo Trail (mine)
You can roll up the whole system (excluding tarp, poles and groundsheet) when you break camp and then slide it into the dry bag. Then it goes in your pack and, voila, you’re ready to hit the trail!
The shelter is at the heart of the system and it’s hand made by Evan from Terra Rosa Gear, an excellent cottage-industry gear maker based in Melbourne (I bought a tarp off him last year). Jimmy’s concept is adapted from Evan’s base shelter design.

A closer view of the shelter component with sleeping mat, bag, liner and pillow inside. The tarp roof is pitched quite high because of the narrowness of the site (and the width of the 2P tarp).
Sleeping components
In addition, I used the following sleeping items:
- Sleeping Bag – Enlightened Equipment Revelation 20deg (F) down quilt (mine)
- Sleeping Bag Liner – Sea to Summit Thermolite Reactor (supplied by GMG)
- Pillow – Sea to Summit Aeros Ultralight (supplied by GMG)
How it performed
To start, I packed my bag by rolling up the mat, liner and shelter only. After the first night, I left my sleeping bag in too. The whole sleep system (incl bag) fit comfortably in the dry bag, taking up around 20L of the pack. I packed the tarp and groundsheet separately. It weighed in at 1.2kg, as noted, with the potential to go much lighter.

Main swag components (shelter, pad, bag and liner) rolled up and ready to put into the dry bag. The tarp and groundsheet are packed separately.
The groundsheet is optional but I found it useful as we spent a bit of time on muddy/wet ground due to the weather. You could easily get away with a smaller one.
Here are my thoughts on its performance:
- Comfort: I’m a pretty terrible sleeper generally and even more so when camping but I found the whole setup surprisingly comfortable; I pulled the mesh off my face with a cord and never felt claustrophobic or sweaty (nights were mild but cool – maybe 9-15deg, depending on where we were). Sleeping under the tarp is much roomier than your average tent.
- Practicality: It was super simple to pack up the sleep system: I just removed the pillow, opened the mat’s valve and rolled everything up. The whole thing’s a bit bulkier than it might have been using a compression sack. But you save time not stuffing things into separate sacks. I used a Velcro strap to tie up the rolled mat, liner and shelter (until I put the sleeping bag in, then it got too fat). The tarp, however, takes a bit more time/practice to set up/break down (but that’s not really part of the swag).
- Weather Protection: It didn’t actually rain while we were camping so it’s hard to say how it performs in weather, but I stayed warm and snug, and the tarp kept condensation off me when we were camping in a valley. It also offers good wind and insect protection. Note that the soft Tyvek top is breathable but not waterproof so a tarp or other waterproof shelter is required (unless you’re in a dry climate, like the Northern Territory in winter).
- Weight: The total weight of the shelter components (excl. sleeping mat) came in at 1.27kg, which is comparable with many lightweight, double-skin 1P tents (and far more durable and versatile). However, I’ve challenged Jimmy to get it under 1kg with a few tweaks! He shouldn’t have any trouble, especially as my system comprised an oversized shelter (for a large sleeping mat), and a 2P tarp and groundsheet. Note: I exclude the weight of the hiking poles from this as I carry them anyway (hiking poles are the best!).

The swag rolled up and stuffed into a 20L Dry Bag: a bit bulkier, maybe, then individually storing each item but very practical! The Terra Rosa Tarp is in its own sack to the left.

This was my pack for 4-days of walking: the 45L Gregory Stout. I managed to fit the swag along with all my other gear and food without a problem. One of my companions was astounded by how much I was able to carry in my “magical bag”.
Overall impressions
It’s a great system and one that will become my go-to for solo hikes and some group hikes too (like the Budawangs’ walk). I want to do the Larapinta Trail one day and this is 100% the system I’ll take for that. It is a concept that experienced overnight bushwalkers will definitely be interested in. You’ll need to know how to set up a tarp (unless you’re going on a dry climate walk). You’ll also need to use hiking poles or carry a substitute.
We’ll have to wait for the final price tag too (but remember it’s worth paying top dollar for good gear, especially if it’s locally made/designed!).
Oh and cue bonus street-cred (or trail cred): a group we ran into on our last night in the Budawangs said “It looks like you do a lot of walking!”.
I’ll be keen to see how Jimmy evolves the concept and also to use the system for future walks (hopefully in Yosemite NP later in the year as well as the Blue Mountains). So far, I can say that it’s a winner!

Some backcountry campsite porn: the sun sets over Styles Creek campsite, with the Grab Me Gear swag setup in the foreground. There was a lot of condensation that night but I was very comfortable in the swag under the tarp. I also managed to impress some new found friends with the setup.


3 Comments
Thanks for the honest review and feedback James. You’ve set some good challenges and I’ll have a crack for prototype 3.0, happy travels, Jimmy
Thanks Jimmy. It’s a great concept! Just got back from a 3-day canoe-camping trip when I get to test it out in totally different conditions! Will send you some more feedback (and update the article too). Thanks for reaching out.
[…] little patch of paradise amid the trees (tarp and bivy sack by Terra Rosa Gear), with generous support from […]